

Walking into your kitchen or home office only to watch your video call freeze is infuriating. You pay for high-speed internet, yet certain corners of your living room deliver zero throughput. Learning how to find wifi dead zones at home saves you from buying expensive hardware you might not even need.
When diagnosing dead zones in my own home, I noticed that full signal bars on a phone often lie. A device can show two bars of signal while failing to transfer a single packet of data. Isolating the real problem requires mapping your space with precise measurements rather than guesswork.
Understand What Creates a Dead Zone (and What Doesn’t)
A true dead spot is an area within your home’s footprint where wireless signals drop entirely or degrade past usability.
Most dead spots stem from physical barriers. Dense structural elements like poured concrete, brick chimneys, and wire-mesh plaster absorb high-frequency radio waves almost instantly. Metal mirrors, stainless steel refrigerators, and radiant barrier roof insulation bounce the radio waves away like light hitting a mirror.
The Federal Communications Commission (FCC) notes that physical obstructions and radio-frequency congestion remain the primary bottlenecks for indoor residential broadband distribution.
Signal Interference vs. Band Steering Traps
True physical dead zones differ sharply from RF interference or handshake dropouts. If your smart plugs drop offline whenever the microwave runs, that is local radio frequency collision on the crowded 2.4 GHz spectrum. If you frequently wonder why do smart devices keep disconnecting from wifi, radio congestion or aggressive band steering is often the culprit rather than a dead zone.
Dual-band routers broadcast two separate frequencies under a single network name. The 5 GHz band delivers incredible speeds but struggles to pass through two sheets of drywall. The 2.4 GHz band penetrates walls easily but delivers sluggish speeds.
When walking through your hallway, your phone might cling stubbornly to a fading 5 GHz connection at -82 dBm instead of dropping down to a clean 2.4 GHz signal. The result feels like a dead zone, but it is actually a roaming failure.
Signal Strength Benchmarks: Reading Raw Decibels (dBm)
To diagnose your home accurately, ignore signal bars. Instead, measure Decibel-milliwatts (dBm). Wi-Fi signal power is expressed in negative numbers; the closer the number is to zero, the stronger your connection. The Wi-Fi Alliance establishes strict certification metrics around these reception values to verify client reliability.
| Signal Level (dBm) | Real-World Performance | Status |
| -30 to -50 dBm | Maximum throughput; located within line of sight to router | Ideal |
| -60 to -67 dBm | Fast web browsing, glitch-free 4K streaming, stable Zoom calls | Reliable Target |
| -70 to -79 dBm | High latency, dropped video frames, intermittent buffering | Degraded / Weak |
| -80 dBm or lower | Frequent disconnects, packet loss over 20%, dead connectivity | True Dead Zone |
Method 1: The Zero-Dollar Speed and Baseline Walkthrough

You do not need specialised hardware to spot glaring signal drops. A smartphone and a browser-based speed test will give you a functional baseline.
First, stand three feet away from your main router with a clear line of sight. Run an online speed test to establish your maximum ceiling for download speed, upload speed, and ping.
Next, walk room to room, testing specific task areas: your desk, your bedside table, or your kitchen island. Stand still for thirty seconds before hitting test to let the device settle on an antenna band.
Record your numbers in a simple notepad. If your download speed plunges from 400 Mbps down to 8 Mbps behind the guest bathroom, you have pinned down an attenuation problem caused by plumbing pipes and tile.
Method 2: Use Built-In Smartphone Diagnostics
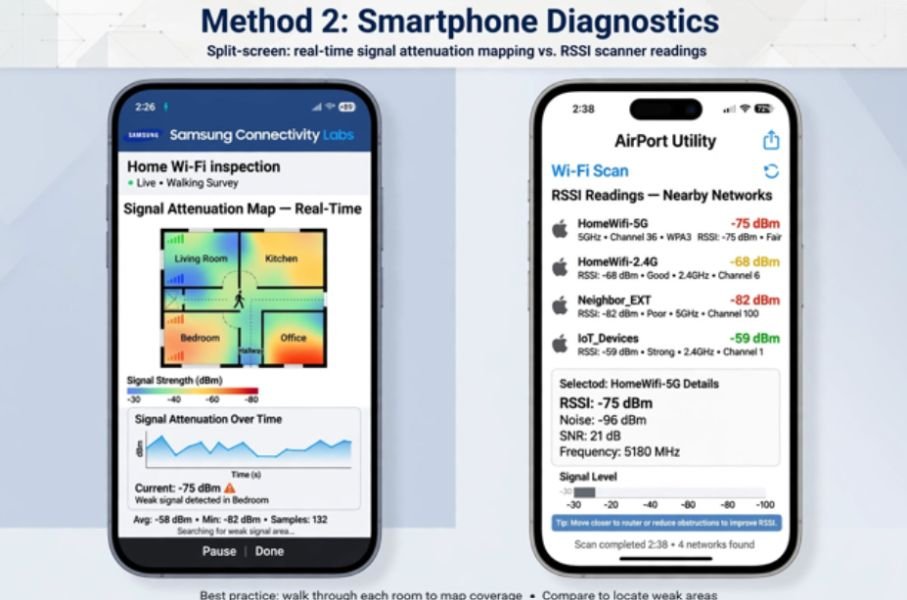
Your smartphone contains internal hardware sensors capable of reporting direct dBm numbers without buying professional field meters.
Unlocking Samsung Connectivity Labs
Samsung hides a dedicated RF diagnostics suite inside One UI:
- Open Settings > Connections > Wi-Fi.
- Tap the three vertical dots in the upper-right corner and select Intelligent Wi-Fi.
- Scroll down and tap the text label Intelligent Wi-Fi five to seven times consecutively until a developer prompt confirms that Connectivity Labs is unlocked.
- Tap the newly revealed Connectivity Labs menu at the bottom.
- Select Home Wi-Fi Inspection.
Walk slowly through each room while the tool maps real-time signal attenuation. Any area displaying a persistent figure lower than -75 dBm represents an immediate problem spot.
Configuring Apple AirPort Utility
Apple restricts basic iOS apps from reading network hardware tables directly, but their proprietary utility bypasses this limitation. Apple Support provides complete documentation for their diagnostic tools:
- Download the free AirPort Utility application from the App Store.
- Open your iPhone’s system Settings menu, scroll down to the app list, and tap AirPort Utility.
- Toggle the Wi-Fi Scanner switch to the On position.
- Return to the AirPort Utility app and tap Wi-Fi Scan in the top-right corner.
- Set the scan duration slider to 4 seconds to prevent battery drain and stale readings.
- Tap Scan and track the RSSI (Received Signal Strength Indicator) metric as you move through your house.
Method 3: Generate Visual Signal Heatmaps with Dedicated Tools
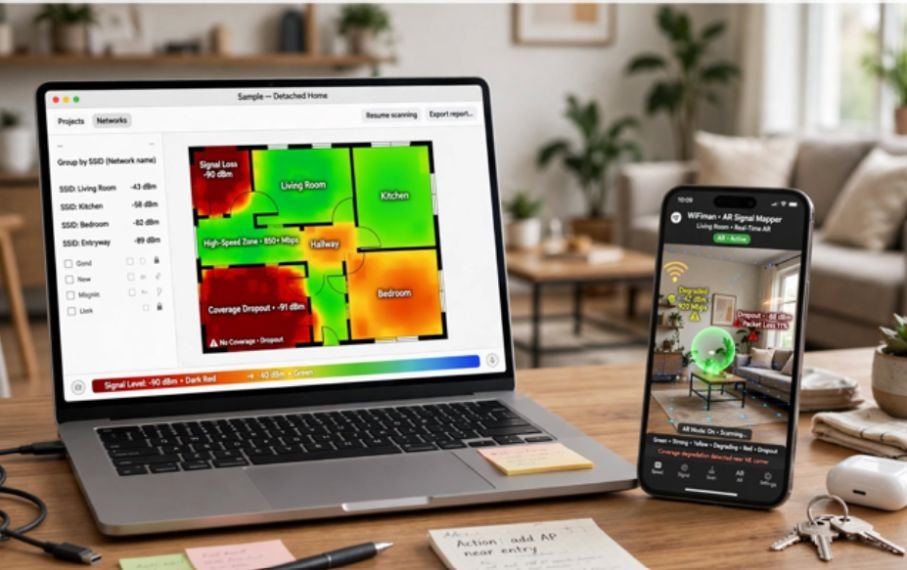
If you want an unmistakable floor-plan view of your home’s RF coverage, third-party heat-mapping applications remove all guesswork.
Software options like NetSpot (Windows and macOS) allow you to upload an image of your floor plan or draw a basic perimeter sketch. You walk to distinct points in your home with your laptop, click your corresponding location on the screen, and sample the airwaves. The program renders a color-coded thermal heatmap highlighting high-speed green zones and dark-red coverage dropouts.
For mobile-first mapping, Ubiquiti WiFiman (available on iOS and Android) works with modern phone sensors. On devices equipped with LiDAR, the app uses augmented reality to anchor signal readings in physical 3D space. You literally see floating markers in your living room displaying signal degradation in real time.
What to Do Once You Map Your Drop Spots
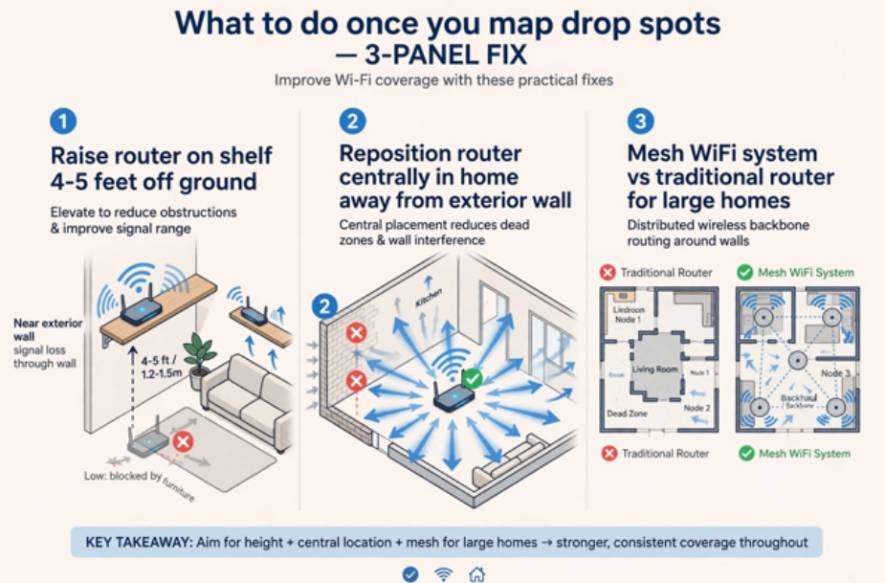
Locating the dead zone is half the battle; fixing it requires a measured response.
- Raise your router: Never leave your wireless gateway sitting on the floor behind furniture. Raising it onto a shelf four to five feet off the ground often eliminates dead zones on the floor directly above it.
- Reposition the router centrally: ISPs almost always install the main gateway against an exterior wall near the entry point. Moving the router to a central room cuts the average distance signals must travel to reach your devices.
- Evaluate coverage solutions: If solid masonry or square footage prevents your router from covering the whole house, evaluate mesh wifi vs traditional router for large homes to build a distributed wireless backbone that routes around dense structural walls.
Stop Suffering Through The Static
Living with Wi-Fi dropouts turns everyday work and downtime into an exercise in frustration. Put down the streaming remote, fire up a diagnostic scanner, and track your signal down to the exact decibel.
Once you know whether you are battling structural barriers or a poorly placed router, you can eliminate weak spots and reclaim your home network.
Frequently Asked Questions
1. Can a mirror cause a Wi-Fi dead zone?
Yes, mirrors contain a thin metallic backing that reflects radio waves away from adjacent rooms.
2. What is the fastest app to find dead zones on an iPhone?
Apple’s official AirPort Utility app is the quickest free tool to read raw RSSI signal strength on iOS.
3. Is -70 dBm considered a Wi-Fi dead zone?
No, -70 dBm represents weak but usable signal; true dead zones drop past -80 dBm or disconnect entirely.
4. Will moving my router fix dead spots without extra hardware?
Yes, shifting your router to a central, elevated location clears line-of-sight pathways and frequently fixes localized dead spots.















One thought on “How to Find WiFi Dead Zones at Home: A Hands-On Guide”